Showing posts with label field-walking. Show all posts

Wednesday, February 8, 2012

Examining the new snake props

The diagram is the first practice layout delivered to the public by Sup'Air. The use of the new snake bunkers mirrors the original photos and should be accepted as a reflection of Sup'Air's conception of how the new snake will play generally--although other configurations are possible. My objective isn't to claim the new snake bunkers are unplayable--they aren't--but to clearly demonstrate that the new bunkers are not an improvement--as was predicted here earlier--and also have other drawbacks.
(The issue of how and why this change is being made is a separate issue. Over at PBN AG's U.S. rep has claimed comments made here at VFTD are "allegations and untruths" they will not respond to. When confronted with a Lane Wright quote also on PBN, in a different thread and forum, along with some clarifying questions AG has chosen so far not to respond to those either. Nor has AG commented here at VFTD. Until such time as AG can demonstrate errors of fact VFTD stands by the content of all prior related posts.)
Two shooting zones are highlighted in gold. They are the zones available to the snake side insert T and snake corner. Between them they cover the majority of the snake (as does the MR snake feed.) I have highlighted the T instead of the MR because the corner cannot contest the insert T's shooting zone. the result of this is the insert T has more or less free play to cover the snake. Now if you examine the green and purple lanes between the snake and various crossfield props you can see who the snake can shoot at and who can shoot back at the snake. (The dotted line indicates at least a partially obstructed lane at best.) But that's not why I included those lanes. Where the lanes connect to the snake indicates the approximate position of the snake player in order to shoot into and across the field. Contrary to the idea the snake player will be called on to use the whole snake the lanes make it clear that there are key spots where the snake player will expose himself coming over the top and that the insert T can shoot pretty much all of them.
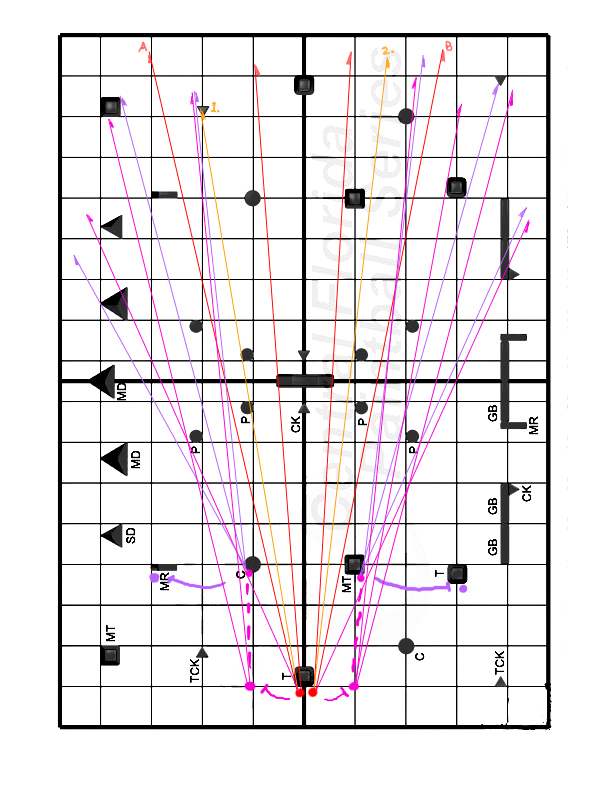
[Keep in mind this is the sample field AG put out to demonstrate their conception of how the new props will play.]
Take a close look at the snake 50--and beyond. Can the opponent's side of the snake be played at all if there is any opposition on the snake side of the field? One other characteristic of the new bunkers is to make them nearly unplayable past the 50 with a risk that so vastly outwieghs any reward that it simply won't happen given this layout. The problem isn't limited to this layout either. It's inherent in the bunker conception. (And, FYI, if the MS field layouts continue to be as compact as the recent ones the new snake will be even worse than in a PSP application.)
The bunkers highlighted in pink can't be targeted from the snake--although Home may be dependent on precise placement of Pins & Can. The D-wire feed MT however will end up being played constantly to contest the D-corner and the feed gap to the wire without any concern from across the field. To a large extent the reverse is true of the bunkers in green given they have been specifically blocked from contesting the designed shooting spots out of the snake which will limit their utility. Given their exposure to cross field angles and inability to battle the snake good teams will have little reason to play them. The overall impact of the effort to make the new snake props playable is a failure and creates an utterly predictable pattern of play on the rest of the field--slow play at that unless multiple bodies drop OTB--and this is the sample Sup'Air put out first to show off their new props!
Looking beyond this single design a couple of other things ought to be apparent. The effort to incorporate the new Adrenaline Games snake concept requires the rest of the field layout to be designed around making the snake playable. This in turn will limit design options until such time some of the traditional snake bunkers are incorporated again at which point AG concedes the new bunkers were unnecessary.
And if we backtrack a year we know that the PSP, with the rules changes of 2010, intended to have field layouts be more inclusive (old, fat & slow) but also encourage aggressive play. Last year's layouts were neither. Why not? In part because the league found using Sup'Air to create field layouts was convenient--and, bottom line, apparently nobody involved in the process knew what the consequences of the designs was going to be. But shouldn't Sup'Air at least understand the consequences of their designs? And if they don't are bunker changes just a crapshoot too?
Whatever else happens the PSP should take this opportunity to take control over a key element of the league's product and identity.

Aussie Super 7s, event 1

VFTD has never done a field analysis for the kids down under---at least I don't remember doing one so here it is. But before this goes any further this is absolutely and categorically the last one--for now. And now means for the foreseeable future. (I try to get out and you keep pulling me back in.) There are plenty of breakdowns of past major league events (and others) in the archives. While not the same thing those interested in learning or picking up new ideas will hopefully find previous breakdown posts helpful.

This layout is the MS Fuengirola Beach event in 2009. I'm going to focus on the OTB lanes, OTB dead zones and necessity to get guns up and rolling. With the exception of the four corners it is a very compact layout with a very strong snake. That compactness and the likely tendency of teams to want to play and fill the corners will allow for some very aggressive play we'll talk about shortly.
Diagram a charts some of the breakout lanes. They lanes have been matched to a relative shooting position. For example position A is shading the wireside of D-side Temple insert. Anyone in position A is either crouching and moving up into the T or still on the move to the wire but momentarily delaying. By reviewing the arrows it's easy to pick out specific lanes. In the example you can see that A is laning the corner and/or D1 gap. A can also lane inside the wire MT. Positions B,E & F are blocked from a Home shooter which allows B to stand up and shoot over the Temple if/when no counter lanes are being shot into that zone. Keeping in mind that any lane that can be shot can also return fire which makes the timing on your OTB delay lanes critical. The place most players get into trouble isn't shooting the delay lanes, it's in staying in that spot too long. Good teams and players will catch on--particularly if you use the same breakout too often--and find ways to counter your laners directly and indirectly. For example, let's say your standard D-side breakout is corner or D1 with a laner at Home that seconds into the T or MT. You are also holding a shooter back in E or F. A strong indirect counter lane could run the D-corner deep and lane the E/F zone before moving up into the corner prop. Positions E & F indicate that the Pins can be played either close or well behind allowing for primaries upfield in the MT, or along the run to the snake or out to the corner. With regards C & D the center M and blocking bunker placements provide a margin of safety that the Home bunker (MC) might not otherwise and allow for two Home shooters. Given the spacing up to the Home prop the best option is to stack your shooters. Each side shooter should come off the board laning while moving up into position but it isn't a prop you will want any of your players to stay in overly long. And your breakouts should account for your Home shooters secondaries. (Be careful of secondaries that require a teammate to move first so that Home fills the vacated spot. It's a common tactic but can get you into trouble on this field with the Pins and limited numbers of insert and feed props.)
There will be some inclination on the part of a lot of teams to want to cross up some of the mid- and backfield props. On its face that isn't necessarily a mistake but can easily turn into one. Crossfield lanes are less effective than closer ones. (D'oh!) And worse, tend to instill a defensive and/or reactive mindset while limiting your offensive options. (Guns committed to the cross can't help push the snake player that extra knuckle.) Use crossfield lanes sparingly at most and primarily as an option for countering your opponent's effectiveness if nothing else is working. Having trouble containing or battling on the D-side go ahead and cross up the midfield MT but make it conditional. Get a D-side kill switch back. Lose the snake corner, switch back. And so on.
Diagram b highlights a few props and some shooting lanes. The snake corner is red because it is an essential bunker. It can feed the snake and inhibit your opponent's movement in the snake and as such must be played. However that doesn't mean it must always be an OTB primary. There is no reason you can't mix up your breakouts enough to remain unpredictable. That said, if and/or when snake corner isn't in filled the upfield MT needs to be in order to hold the opponent's snake player in check. The red lanes indicate the opportunities the snake knuckles circled have to eliminate or pressure opponent positions. (A review of D-wire lanes don't offer comparable opportunities.) The red path (running highway) indicates that there are a number of options for running down snake players on this field. (Any time there is no inside/out gun defending a highway run is a doable option.) The orange lanes indicate options for bouncing paint off the Pins into opponents indirectly. The orange props will be played with high frequency despite the fact each has limited utility. The issue with each is while they provide some unique opportunities they also will tend to slow the game play down. The thing to keep in mind is the close spacing on the wires and the mirrored pairs of midfield standing props. The standing props provide interior upfield movement lanes and the close spacing encourages aggressive plays; bunker moves. In order to take full advantage of the aggressive potential it's important that your player spacing allow you to take advantage and control the field when you force trade outs.
Guns up OTB. (All 5!) Be patient when you delay--let the other guy run into your gun. Mix up your breakouts. Control the snake. Act, don't react. Nothing to it. 

Wednesday, February 1, 2012

CFPS 1 Breakdown

Let's begin with a quick review of the layout. It's nearly an archetypal Xball design except there's little value in attacking up the center and none of the corners offer any significant wire control. Each corner section of the field is made up of a triangle of three props; the insert, the feed and the corner. The value of playing the corners is largely to command edges from an advantageous position in assisting teammates to make the move to the wire and/or denying same to your opponent. Adding some variation are the two mid standing props; the D-Can & the Aztec. To regular competitors even these ought to look familiar as this relative placement is quite common as well. Given the layout the points played will feature (and reward) strong gun play and coordinated action. (Communicate, communicate, communicate.) The mid-field stand-ups will also encourage some teams to play them consistently and defensively oriented teams will want to cross them up as often as not. Our focus will be on the breakout and how to utilise the stand-ups more offensively as part of a diversified attack.
In diagram A the red lines are principle lanes. Note the lines marked A & B. They are the primary OTB lanes from Home. The interior red lines are optional and only useful if your opponent is delaying their breakouts or attempting to counter your Home shooters. Take a look now at the orange lines marked 1 & 2. 2 is an option to either red snake side lane and may catch the occasional floater intent on shooting a lane before making his/her primary prop. If the opponent is consistently breaking hard that lane is unlikely to be effective as it will almost always be late. 1 is a bit different. Note how the lane crosses over a Pin. One of the secrets to effective laning OTB is to find and utilise unusual lanes that catch players unaware. However, there are risks. In this case the Home shooter must shoot the lane standing--or nearly so--otherwise the paint won't drop in time to hit the TCK (and be at a level that may catch your opponent.) (Shooting lane 1 from a kneeling posture won't be effective because of the angle change unless the shooter's velocity is well below normal ranges.) Likewise, standing or not shooting over the mirror Pin on your opponent's half of the field won't hit anyone except perhaps a player delaying close to the back boundary. The pink lines show the secondary lanes available if the OTB shooter stays Home or makes the delayed move to one of the mid-field stand-ups. Note that the pink dots approximate alternative "Home" OTB laning positions and offer the shooter good laning zones and the ability, in most instances, to put paint on likely props. The purple lines are the same side lanes that are available once the player is in a midfield stand-up. Take note of purple arrows indicating a rotation toward the wire from the stand-ups. The stand-ups offer an excellent alternative path to the wire feeds particularly if there is a teammate in the corner. (The best option is to match that rotation to a support player in a corner but it isn't necessary.)
Switching to diagram B note the props surrounded in green. The green lines represent the primary Home OTB lanes and the more effectively those lanes are shot the greater the likelihood your opponent will begin holding up on their wide breakout moves. Containment provides new offensive opportunities. (This is likely to occur more often on the D-side of the field as most teams will play weakside on the D-side. This means they will tend to commit only two of their 5 players that way.) Better yet if the opposition uses the Can to play the cross field angles you are no facing only one gun caught in a compact insert. And even if, when using the Can on the cross field, Home stays D-side the opportunity to attack the center of the field as a secondary option remains. The goal is to eliminate the widest gun (and at a minimum hold them in that spot) while positioning yourself to deny any moves to your wire while gaining new angles to threaten other positions. So while it is probably not an effective move to go up the center OTB given the right circumstances--circumstances your team can force on your opponent--secondary moves up the middle ought to be nearly automatic responses to the correct set of conditions.
In both diagrams the focus is on making full use of the stand-ups effective lanes while maintaining an offensive mindset. Too often teams, newer and lower division ones in particular, tend toward a defensive approach regardless of their talk or intentions and this can happen unconsciously even in playing certain props--like these midfield stand-ups--that promote a defensive style.

Monday, December 19, 2011

Baca's Mailbag, December 19

For 2012 we will be playing D2 Xball nationally and I feel like all of our gun fighting skills individually are there, but just as a team I'm worried about the overall game plan execution. What are the best ways to lay out a game plan? How to make sure everyone sticks to their objective for that point? AND at what point do you have to change the game plan when it's not working? When you're down 0-3?

A good off season question. One I could (sadly) spend hours and pages answering but for now let's cover the rudiments and follow-up in comments or with another question--or ten. The two core points are simple; the game plan begins with (but extends beyond) the breakout and the players must know their role despite the constantly shifting game play. You have the weekend prior to the event to decide what your breakouts will be and the different ways you will sequence the runs during the breakout. (See below.) And to run those breakouts and run options until your squad is comfortable with the basic breakouts. That's the easy part.
When we talk about roles we're talking both fundamentals of playing the game--What is the wire lead's primary responsibility?--and if you're the third live player between two wire players what's your job in closing out a point? What do you do and why do you do it? And we're talking positional responsibility. What is the job of the snake side insert? When and how does the Home shooter decide to make a move? Too often what happens is teams run their breakout and just let the rest of the point happen. It is important in practice to play various mid- and end-game scenarios as teaching opportunities and in the process use those opportunities to also define what the role is of a each player in various positions on the field. Finally, despite  what seems to be the conventional (uninformed) wisdom it's very important that players communicate on field in order to cooperate and coordinate their actions.
You don't change the plan. You come prepared with a number of breakouts and alternative ways of reaching your desired primaries. You practice them in advance. Your alternatives are designed to keep your opponent guessing--and shooting the wrong lanes at the wrong times--and as pre-arranged responses to certain predicted situations. If we can't get into the snake OTB this alternative will accomplish our requirement with only minimal delay. For example, when you struggle to get your player into the snake OTB add a Home edger who delays his primary run; or trail a corner runner who is gunning back into the Home zone; or send the corner runner first and trail the snake runner who is gunning the Home zone; or delay the snake runner until other guns are in position to counter the lane shooter(s) and slingshot the snake runner once your countering lanes are up, etc. The basic goal doesn't change or even the number of players committed to the effort--just the way you accomplish the task OTB or soon thereafter. But if you haven't practiced these options you cannot expect to execute them in a match.
The basic in-match adjustments are principally changing shooting lanes OTB and responding as needed to inside/out play. Lane adjustments can be anything from edging, to doubling lanes with delaying secondary shooters, changing the zones runners are shooting back into, etc. The reason you change shooting lanes is as a direct counter to effective laning by your opponent, to increase the effectiveness of your laning or to facilitate making your primaries. Knowing when to make adjustments depends on recognizing your opponent's tactics and communicating with your players. Inside/out play refers to the tactical option of either aggressively getting wide and on the wire OTB or keeping extra shooters inside to add lanes OTB and take primaries on the delay or else play short primaries looking to make limited, progressive bumps to the wire(s). The issue is effectiveness. For example, if your opponent is playing inside OTB and consistently eliminating one or more of your players an immediate adjustment may be required. Conversely if you're playing short and your opponent is getting wide and taking the play away from you, again an inside/out adjustment may be necessary. The standard inside/out adjustment is to match your opponent. Alternatively simple lane changes may suffice. Knowing your team and experience will tell you what you need to know. Expect a learning curve and incorporate adjustments into your practice.

Thursday, December 1, 2011

World Cup Practice, part 4

This is it, slackers. A December freebie--and the final installment discussing our WC practice weekend on the event layout. (Yes, I could go on almost forever but I'm stopping with this installment. If you have additional questions feel free to ask or post them up in comments.) It's also now December--and that means Mailbag Month is here. (This is your final reminder that all posts in December, except breaking news of real import--and there's an official one coming!--will be answering questions or responding to mailbag or Facebook comments. And if those run out or don't exist in sufficient numbers to fill December then I'm on vacation! Just saying.)
Recap: So far we've covered a general assessment of the value of the most common primary bunkers; how we will attack & defend the snake and what it will take to play effectively on the D-wire. This time I want to round things out by talking a bit more about actually playing the snake, some alternative options, why the center of this layout wasn't utilised more actively and whatever other bits & pieces come to mind. A veritable post-Thanksgiving cornucopia of game play scraps and leftovers.
How a team play(ed) this (or any other snake) is oftentimes one of the features that separate the men from the boys. On the diagram you will note that the first four knuckles (or shooting stations) are numbered appropriately. As we've already discussed the mid-field MT is likely to be played as a secondary Home bunker and used primarily to deny and/or control the snake. Now, taking a closer look at what the various knuckles offer, why, if you have worked hard to get into the snake and there is a crossfield MT gun--do you stop at the first knuckle and try to play it? The goal of gaining the snake isn't in order to contest other players in superior positions shooting down on top of you while you crawl on your belly. I know, I know, you already know this but a quick review of your's (and most everybody else's) practical experience will demonstrate that you may know dat but you don't play dat.
Ideally the object of working into the snake is to get in position to kill peeps who have no place to hide. In addition the secondary object is to apply pressure to your opponent; pressure that either pins them in their spots or forces them to react. Remember proximity tension? It applies in spades in the snake.
In practice our field was set-up in such a way that the midfield MT did not have a clean gap to shoot between snake 1 and snake 2. On the Pro field at Cup there was a gap. Did it make a difference? Yes but only a minor one. A competent snake player was not delayed for any length of time by the MT and if you watch some of the Pro field matches the thing to look for is players making the strong move right to snake 4 as rapidly and directly as possible. Playing the snake is not a leisurely sight-seeing proposition moving from one knuckle to the next--it's about taking aggressive action that quickly eliminates your opponent(s) or forces your them into a defensive posture. Even if the snake player doesn't get any fast kills the action frequently frees up other players to make moves and take greater control of the field.
One other generalized comment with regards to proximity tension. (Okay, two.) One, if you watch how players respond to proximity tension you will learn a lot about how they play the game under stress. Two, it is always better to give than receive (and I'm not talking about gifts at Christmas.) I'm talking about bunkering your opponent when the opportunity presents itself--and/or proactively making your own opportunities. The benefits are practical and psychological, as one springs from the other. It is offense and not defense, it is active, not reactive. It imposes your will on your opponent. The core move is a momentum builder (or changer) and it simultaneously encourages teammates to act while discouraging opponents resulting as often as not in a net gain in field position with the added bonus of demoralizing the opponent.
At this point it's fair to say we were committed to attacking the wires. We had decided how we would go about doing that and what options and contingencies we could call upon when circumstances required. Our attack may appear simple but it wasn't. But what other options exist? It is always necessary to evaluate the whole field even if you don't plan on using all of it because you also must be prepared for what your opponent might do. (A great example of this is the most recent NCPA final featuring, if I recall correctly, Long Beach State & Tennessee. Losing the match trying to play Long Beach straight up Tennessee altered their attack. Instead of competing for the snake they played to hold the snake and attack using an interior D-side lane. [I kept waiting to see somebody try it all day.] The change in tactics took Long Beach by surprise and they never came up with a workable counter which allowed Tennessee to run off a few points in a row and take the championship. Whether Tennessee was saving that tactic or fell into it doesn't matter. What matters is that Long Beach wasn't prepared to respond to it. Watch the video some time. It's pretty remarkable. Which is why I remarked on it.)
After the fact it's clear that the center of the field wasn't much utilised except in closing points out but I want to take a quick look at why it wasn't. (Lots of teams, when they have nothing else or as a bold change, will send player(s) up the center OTB.) There were a couple of reasons not to attack using this layout's X OTB. On the diagram at either side of the X you will note on the D-side a critical blind zone in pink and on the snake side two lanes in purple. Each side of the X presents a player with variations on the same problem. On the D-side both the wire MT and corner TCK can't be seen. What is the X-side player to do? If there's an opponent wide in either the MT or TCK do you play them to deny the D1 or close the angle? Inside the MR and the midfield MT both have line-of-sight angles and the X-side can be run down from Home. A similar scenario exists on the snake side as the X-side player there needs to either attack insert Temple or corner SD (and TCK) or defend access to the snake--but can't do both--and is also susceptible to being bunkered or countered by the feed TCK. In neither case does going X-side OTB offer a high likelihood of quick kills and/or disruption of the opponent's breakout.
But that doesn't (didn't) mean the middle zone of the field didn't play. On the D-side using the midfield MT as a D-side play (instead of the crossfield) offers a strong change of pace option to either attack Home, a crossfield TCK laner or breakdown snake side players in their primaries early in a point by bumping the Can as part of a move to the wire from the inside out. It also a good running path if your opponent is already strong on the wire. Even better when playing snake side as the strong side--odd gun is committed snake side--is the rotation upfield into the Can (see dashed line). It can be an OTB option but is better as a contingency. By that I mean if you lane the wide runner OTB--then you take the Can to cut off follow-up rotations to the wire and eventually turn the gun inside in the transition from mid-game to close out.
Beyond that there's the routine stuff of walking and re-walking the positions. Testing bounce shots. Talking through options and sequences with your teammates. And on and on. The process is as comprehensive or as simple as you choose to make it.

Sunday, November 20, 2011

2011 World Cup Practice, part 3

It's back! (World Cup practice posts, d'oh.) Despite a lack of popular demand. (This one's for you, Devon.) (Okay, not really just for you but it does prove I almost keep up to date with VFTD's Facebook page.)

To quickly recap parts 1 & 2 practice is for developing players and the skills required to be successful in actual tournaments. Versatility is a key training goal. Not only does the proper sort of training make players stronger where they were weak but it instills confidence in the individual and in the group as a unit. It is self-reinforcing and allows the coach or captain to go from strength to strength. I have watched all the PSP uploaded videos of our matches a number of times. My objective is to look for things I didn't see during the actual match--because during the match I'm watching our opponents, not my guys--so that I can perhaps pick up on things we need to work on. And trust me, I always find fault somewhere. (And sometimes it's even me.)
No player will do anything in a match that he hasn't done or won't do in practice. Read that over again and let it sink in. (Now read it again.) Whatever limitations your players show in practice you can safely expect 10-20% less from them in a real match. (One where the score goes up on the big board.) (And, yes, there are of course exceptions but as a general rule players tend to back off a little, or a lot, from practice to the real deal.) As a consequence the only place players really learn to expand their game is in practice. (To know something intellectually doesn't automatically translate into action.) And once a player has a couple of years of competition under their belt it often requires that you intentionally push them places they otherwise wouldn't go. (Players tend to settle, get comfortable in specific roles, want to do the things they already do well, etc.)
One caveat. Last time (practice part 2) I mentioned moving players around and the fact we made that call while also prepping the event layout the weekend before Cup. I want to caution lower division teams with less experienced players about doing the same. Developing versatility is a process and should be worked on primarily in practices that aren't layout prep. The reason for this is confidence and team cohesion. With a young, building team and/or inexperienced players last minute changes of that nature can (and usually do) play havoc with player and team self-confidence. (There's lots of stress, mixed in with the excitement, for developing young teams contemplating a big event. Following routines and focusing on the positive as your lead-in is normally the best approach.)
Back the Cup layout.
Part 2 left off with a description of the back and forth process involved in determining how we would play with respect to a single prop; the D-side MT. Part 3 will dissect playing the D-wire and the various control options. Beginning with the Home shooter the diagram illustrates 4 lanes. Lane 1 is an occasional lane best used after edging the MT consistently and changing the opponent's path. Lanes 2 & 3 are the primary OTB lanes. Lane 4 may or may not be available depending on the actual physical field set-up but it's a tight lane and less effective than 3. The first half of Saturday we shot Lane 2. I wanted to be able to get paint on any D-side runner, including dropping short into the MR, but we could not put a consistent lane up in that close to the breakout. So we moved to Lane 3--and began putting paint on their runners consistently. (Once the opponent is forced to take the MR on the breakout more often than not playing the dead zones--blue dots--becomes an effective option to either lane the MR and/or attack the Home shooter before they can get out.) (Home shooter can also be the dead zone shooter.) The only effective D-wire control bunkers are in Orange and Purple. (The Violet option of playing the MT D-side offered only marginal utility and even less than it appears on the diagram due to the narrow laning window.) (Green can only cover very limited lanes and cannot be relied on to control movement.) The cross field Orange is one of those situations that require a constant paint stream, more or less, and actually only pins the opponent in D1. As a consequence we used this option randomly--unless we were under heavy D-side pressure (which as a practical matter didn't happen)--to slow upfield D-wire progress and force the opposition to always be aware of the possibility. In concert with Orange we used Purple (MR) for layers of contain. Given that the the MR has a positional disadvantage versus the D1, corner TCK and wire-side MT the object is not to gunfight edges, it's to inhibit (deny) movement.
Okay, given that post breakout movement on the D-wire has the potential to overwhelm efforts to deny movement control guns aren't enough. (And are, of course, also fundamentally defense-oriented requiring a transition from defense to offense.) The other factor at play is what I call proximity tension. Proximity tension is what happens when opposing players get close to each other. Too close and you risk getting bunkered. Too far and you may give up additional spots but in any case proximity tension means that the first team to get upfield position tends, simply by already being in a spot, to inhibit their opponents up wire movement.
Early on Saturday Dynasty took aggressive advantage of pushing the D-wire when we couldn't contain the wire lead with our lanes OTB. Once we began shooting an effective lane, Lane 3, it forced Dynasty to mix up their D-side breakouts. (Dynasty hadn't done much better with their contain and the result was a lot of back and forth bunkering action.) Overall the edge went to Dynasty as their support/insert players were more aggressive. (Remember they were also doing a very effective job early of getting into the snake adding heavy snake cross field pressure at the same time.)
Another important element is running lanes and the critical distinction is spacing at the intersection of the shooting and running lanes. The MR placement tends to force a flat run early regardless of primary bunker. Since the primary lanes OTB are on both sides of the MR the goal is to get as much separation between the two running lanes as possible in order to force your opponent to have to pick which lane they will shoot OTB. On this layout then a tight run around the MR into the wire side MT (diving it even!) is a necessary option along with a baseline run to the corner. (A lot of teams simply ran deep all the time and that is not going to work consistently against a good laning team.) 
Given that consistent and effective contain was really mostly a delaying tactic our goal became to get on the wire quickly and up the wire even faster. Once the objective is clear the issue then becomes execution. Can the players consistently do what is required to achieve your goal(s)? If yes, you're good to go. If no, then you need to reconsider your options because it does no good to ask players to do something they simply can't so in that sense we return to training for versatility in order to open up the available options for competing on any type of layout.

Next time--putting it altogether. 

Friday, October 28, 2011

2011 World Cup practice, part 2

Yesterday was the set-up. Today we begin to dig into the details. But before I get into specifics I want to suggest some Big Picture ways of thinking about the practice process whether we're talking drills, intra-team scrims or full blown match sims against real competition. It is not about winning. Points, matches, the day or internet bragging claims. Nobody gets the trophy for practice. It's about becoming better players and a better, more fully prepared team. It's about taking every opportunity to improve; to learn. In this instance it's about learning the specific field inside and out, individually and corporately, and matching our talents to the demands of the field. In this process you are testing various options; everything from breakout runs--do we run & gun or just run?--breakout action combinations (paths, sequences, delays, spacing)--lanes OTB--and counters to your opponents actions--and adjustments to his counters of your efforts. There are too many important things to accomplish to worry about "winning." (There is one important caveat to the "winning" practice isn't important conversation. And that is dependent on the personalities on a given team. If a team has very limited competitive experience or tends to lack confidence as a group or perhaps wilts a little under pressure a team's leadership needs to be aware of those tendencies and act accordingly. It may be necessary in those sorts of circumstances to tread more carefully but even then the time has to come where the team either steps up to the challenge or they don't.)
Also, a quick note regarding individual players. Versatility & competence. The more options you as a player can perform at a high level the more utility you have to your team. Do you not worry too much in practice about your laning ability 'cus that's not what you do? Are you exclusively a snake player? Or a doritos player? If your skill set is limited what happens when a player comes along who does your job better than you do? Here's a football analogy for you: Think running backs in the NFL. Do you know what the number one deficiency is that keeps skilled runners off the field? It's the ability to block and pick up blitzes. But what's that got to do with running the ball like Barry Sanders? Nothing but it's still part of a running backs job description in the NFL. Running backs who want to be in the game for more plays learn to block. If you want to be more valuable to your team and get as many reps on the field as possible the more things you do well the better.
One of the things we do in practice is move players around. In practice there are no snake players or dorito players or Home shooters, wire leads or inserts. Are some guys better at some aspects of the game? Sure, but everybody is capable of playing pretty much everywhere and fulfilling all the roles required and the better they are at more parts of the game the more they are relied on and the more different situations they can be counted on to play effectively. On the Cup field we made a number of positional changes from our norm. Ramzi was returning from an injury and in practice was struggling a little bit to find his rhythm playing the snake. Instead of having no options I moved him to insert and moved Holliday over from the D-wire to snake lead. I could do that because Ramzi is a very good lane shooter and support player when called on and Holliday was (and is) a great snake player before we moved him to the D-side. And we didn't leave a deficiency on the D-wire because Jake has improved so much this year I was totally comfortable with him as a D-wire lead along with Chad. On Friday we were without Bryan Smith so Timmy & Jason did some double duty playing both sides of the field. No problem. On Saturday and Sunday with Bryan in the line-up Timmy played exclusively on the D-side even though he almost always plays the snake side (because he too is an excellent snake player.) This time we needed him on the D-side and it wasn't an issue. Plug & play. But it wasn't (isn't) enough for one or two guys to be versatile. Numerous members of the team needed to be able to fill changing or different roles effectively in order for me to be able to make those changes.
Back to the Cup field--and the forward MT most everyone was playing on the cross to try and control snake entry and movement. Given my pre-practice evaluation we began Saturday's scrimmage both playing the MT and looking for ways to deny the MT to Dynasty. I didn't like taking it off the top (as I thought it mitigated the effectiveness of our OTB lanes) so we mostly moved into it on a delayed basis. Either immediately after laning from Home OTB or later in the point depending on Dynasty's ability to get into the snake. Over the course of the two days of practice it remained an option but we used it less and less. Instead we chose to counter from the dorito wire or from within the snake itself. It was possible for D-side players to stay alive even with a snake player in the midfield snake segment so we didn't worry about it to the point of consistently committing a player to try and stop the snake.
Coming to that conclusion involved the full two days however. Early we tried pinching the MT runner OTB with a D-side Home shooter and edger--which was frequently effective but allowed a free run wide. Later, after Dynasty started using the snake corner to harass the MT we slowed our Temple insert runner in the zone between the TCK and the Temple (snake-side) where he could lane the player moving into the MT who was, initially, still focused on shooting the head of the snake. Later they countered by shooting a primary lane inside the Temple to hopefully get a runner and counter our ability to kill that guy early. At which point we ran the corner and up or straight into the snake because on the break the MT was no longer defending the snake, he was defending himself. And when we had little success early denying Dynasty the snake we started playing the dead zone behind the Can (snake-side) and doubling up our lanes OTB. Dynasty tried to counter with edgers and running & gunning wide. The edgers weren't very effective so we settled on shooting the lane inside the Temple to catch either a snake or corner runner. And we tended to stay at Home early if the opponent hadn't got into the snake because both the snake corner and insert Temple could harass the MT player's edge but couldn't shoot at a tucked in Home player. (OTB Home was susceptible on the D-side so when teams would pack Home in hopes of getting up extra lanes and then breaking to short primaries we edged them from the D-side mostly or ran & gunned both corners.)
The point is we're (so far) only talking about one key prop and the process through practice of determining the best ways to play it and counter it and if either team had been more focused on "winning" practice we would have learned less, experimented less and ultimately been less prepared for the real tournament.

More next time.

Thursday, October 27, 2011

2011 World Cup Practice, part 1

We actually went three weekends in a row leading up to Cup but this series of posts is going to focus on the weekend with Dynasty when we had the event layout to scrimmage on. In the two preceding weekends I designed specific layouts for us to play intended to help us focus on certain elements of the game. I made the wires difficult to play, with unusual and smaller props, and set-up a number of edges that required routine gunfighting for control and making moves. The fields also, under ideal circumstances, allowed big moves--and one of the two layouts had a snake broken up with MR bunkers and gaps--so I got lucky guessing that one. The object was to force the team into repetitive actions during the play of the points that reinforced (and sharpened) both the individual and unit skills necessary for success. I tend to prefer duplicating game conditions as much as possible over most sorts of drills. (Certain drills however remain necessary and when doing those we also try to make the action, however limited, consistent with the way we play the game during a match.)
The final weekend's prep began for me when the field layout was released on Wednesday. (If you didn't play Cup it would probably be helpful to print out a copy of the layout to see the props, angles, etc. being discussed. I'll post one up in the next post as well.) I reviewed it cursorily on Wednesday and Thursday to get familiar with it without drawing any conclusions. On Friday I began breaking it down in earnest. My routine, which is just my routine and possesses no magic formula or secret, starts with lines of sight (and used to include taking measurements. The measurements were a guide to distances from likely guns in relation to gaps players move through. I don't do that anymore because I've been doing this so long I don't need to.) With the lines of sight a picture begins to develop of your lane options OTB and which bunkers offer which shots and vice versa--who can shoot you and from where. At this stage it's all a rough projection that needs to be confirmed on any given actual field since conditions are always somewhat different for a variety of reasons. With experience a sense of how the layout will play begins to form. (Also, with experience--or Warpig's 3D field simulator--it's possible to also consider how the different elevations in play will effect situations on the field. By elevation, I mostly mean player position; standing, kneeling, crawling. Tight in a prop or able to play more loosely. Elevation affects gun angles and vision. What you can see and what you can shoot at.)
My initial evaluation was that the field encouraged defensive play from the midfield MT and the snake insert TCK on the cross particularly given the fact Home was a Pin. Those uses were all the more likely because of the limited ability to attempt to control movements from other positions on the field. On the snake side the TCK, insert Temple and corner SD were all poor options for controlling rotations into the snake. Only the forward Can provided the open angles and field of vision and it was a high risk primary. Even Home was less than ideal given it's bunker size and the number of positions that could bring paint to bear. On the D-wire the midfield MT had very poor visibility to the D-side and the length of the wire was sufficiently aligned that controlling movement up the wire from the wire was basically impossible. That left the insert MR and the two upfield Cans, one on each side of the field. The Cans were high risk and the MR put the player trying to control wire movement at a disadvantage vis-a-vis pretty much everyone on that side of the field. The issue for both the MT & the TCK on the cross was distance from the zones covered and inability to see players making aggressive inside-out runs until it was too late necessitating a constant stream of paint to hope to be successful in consistently denying rotations up the D-wire or into the snake.
The other "problem" I had with that was playing defense OTB tends to make your team reactive instead of proactive. You are waiting for some condition to be met or the other team to do something before taking the initiative and/or playing offense. Frankly I think that's a bad idea all the way around.

Tomorrow. (Next time.) How early points played reflected expectations (or defied them) and how each team adjusted to changing attacks.

Wednesday, August 3, 2011

GFOA Event #6 field layout

Aight, this is the last one of these I'm doing for a while. And trust me, I wouldn't have chosen to do this without a special request. It was a Facebook first--and maybe last. This particular layout is quite narrow, around 25 feet narrower than a standard xball layout. I don't know if that's normal for the GFOA or not but since they allow 15 bps the reduced distances will help players get wide. If this narrow layout is not the norm expect players to wide with greater consistency than usual.

The OTB Home lanes are much better on the snake side and it will take a quick post and a tight lane to shoot peeps off the break on the D-side. The lanes are there but they are narrow. And on both sides of the field the spacing between the corners and the initial wire props should force shooters to pick the prop they are trying to deny. Additionally the lanes from Home provide some opportunities to deny movement upfield and in the case of the snake to also to contest shooting positions so expect teams to keep a player Home for extended periods of points. On the other hand this layout presents real opportunities to teams and players that are willing to be bolder and more aggressive. Instead of waiting for the play to come to you this field let's you take the play to your opponent with that Home player if you're willing to push the envelope a bit. Either TCK is a viable early option as they can play both ways. The snake side TCK competes with the whole wire and feeds the corner, snake 1 & the Can. And the Can is a reasonably safe play until your opponent reaches the D-side 50 which means the Can can be played well into the mid-game and used to make the bump into snake 2 or even up into the Pins or X-side. The larger point is in strong side play (3 or more players) a Home gun is a neutral play but the lanes available are mostly defensive. Swinging out the Home player puts a extra gun into your offense.

This layout will play very much like a slightly small traditional xball field and that's a good thing as the narrow field also brings the center into play more easily. Looking at the lane options (blue & green) from snake 2 & D2 you can see they are well balanced in terms of targets of opportunity. The difference is D2 will be easier to reach on a regular basis. That will prove true for most D-side props. Snake side will be contested more hotly prop by prop and playing from an MD is much easier than a MR. (The angle on the MR will expose a careless shooter to angles the player can't see so be careful.) The blue squares not only indicate options for a Home player to maneuver but also indicate the primary gap control positions on the field. (Bunkers you can play that allow you to contest an opponents movement along one wire or the other.) The snake TCK will be difficult but that doesn't mean it shouldn't be played. Snake corner will also be important as it's a fortress on the back line and can contest movement up the snake on the wire side. (The only weakness of this layout is the MTs in the four corners given the likelihood of having to close points by digging those ticks out after they've crossed up. Practice doing it.)

Lastly there are opportunities to attack using the D-side inside Pins--the ones closest to the X (A). Walk them carefully and you'll see who is blocked and the quick kill shots available.

Should be a fun field to play--enjoy.

Wednesday, July 20, 2011

Putrajaya Cup

A VFTD first--back-to-back layout reviews. (And pretty much my work limit for the week on VFTD. Luckily Mr. C has come thru and will begin with the latest in rumorology tomorrow.) Today's layout is for event 5, the season finale, of MPOC, in Malaysia and came over the transom as a special request. Unfortunately the event is this coming weekend so there won't be a lot of additional practice time available. Best of luck to all the teams competing for a podium spot and a season title. (Ok, best of luck to all the rest as well. Don't want to leave anybody out.)

First off this is a, d'oh!, symmetrical design meaning each half and each side are mirrors of the other. It also means the lanes on the grid in orange and red apply to both halves of the field. (I didn't put them all in as it would have gotten muddled and confusing. Just keep in mind if it's a lane on the left, it's a lane on the right as well.) And even though crossfield shots exist with the M perpendicular to the baseline(s) the field will tend to play in halves; D-side & snake side. Given the symmetrical design that isn't particularly relevant on this field. What will be relevant are strong side and weak side considerations. Which side does a team normally commit three players to and which side do they leave with only two? First consideration is handedness. On a neutral layout most players and teams, if they think about it, will tend to want to play strong to their strong hand. This could easily end up in unbalanced halves of 3-on-2s OTB. Ideally however the goal is to kill somebody quick.

Which will be easier said than done given that Home is a SD (small dorito) offering only marginal cover that forces the laner to tuck in low. Add to that a number of the clean lanes (in orange) are tight and slightly misplaced props could block them completely. And the spacing between the corner MTs and snake insert aztecs (or S1, MD) give good odds of making the snake OTB if they mix up their breakouts well.

Some teams will keep extra shooters Home OTB despite the SD. You must keep them honest by countering that effort right away. The means to do so, and add some complexity and effectiveness to your OTB shooting lanes is close at hand. The Pins framing Home and the TCK in the center (in red squares) are made to order. While small and frequently tricky to play the Pins here are more useful than is often the case. Most of an opponent's likely primaries do not have angles on the Pins which allows a little more latitude in playing them--and getting out of them afterwards. They can be used to edge Home, to set up crossfield angles or to get an extra lane up OTB on that side of the field. I've included the center TCK because it offers variations of the same options that the Pins and also provides the best angle for gap control in denying rotation into one of the snake MDs. I would not consider it a consistent or frequent play, but, like the Pins, it's not as badly exposed as it might at first glance appear to be and does offer the immediate option of taking the M if you've cut down the wide player(s) on one side of the field.

Let's talk snake. Short snakes with dominant bunkers tend to bog play down. As do larger props in corners. The objective, whenever possible, should be to deny your opponent a move into the snake while you get in as soon as possible. The snake 50 has a large number of quality shots but is a high risk position. (See blue squares.) The issue is not only that it is dominated by the MDs, it is also proximate to the MDs and not easily defended. As such play is likely to break down to dueling doritos if both teams are in the MDs. The best way to make effective use of these snakes is keep the other guys out.

Ideally the best teams will play on their feet as much as possible with their guns up and rolling in an effort to dominate the first few seconds so they can move aggressively into high value primaries as quickly as possible. Barring that--such play requires first class gun skills and a commitment to execution--points could devolve into relatively slow affairs with players buried in the bricks and seeing no great advantage to making moves away from their corner fortresses.

Tuesday, July 19, 2011

2011 WCPPL Battle Royale

First, this is an excellent layout that should be fun for all skill levels while presenting the better teams with a real challenge as well. (Could it bog down? Yes, but only in games where teams are equally matched and equally timid. I'll say timid instead of what I'm thinking.) Team paintball or at least paintball in pairs will be at a premium on this field. (Let me take a second and explain what I mean by paintball in pairs. More often that not typical breakouts see two players committed to each side of the field--even when one stays Home to lane first--while the dedicated Home shooter is usually committed to one side or the other; strong side snake or D-wire. The most effective effort derives from the pair of players working together, playing off each other and the lanes Home is shooting to gain secondary positions and begin eliminating opponents. Too often, even in those basic situations players tend to play in isolation. Playing in pairs can limit the number of necessary gunfights and brings extra firepower to bear where and when its most effective, among other things.)

There's a lot to cover so most of this will be short on in depth details. If you have any questions post them up in comments. More DZ (dead zone) talk on playing the D-wire. Denying rotations on the D-wire or all out attack? Playing the center. When Home is only a TCK. Making the snake. The dominant early and mid-game bunker. Snake side DZ & when to use it. Whew!

The grey shaded areas are approximate zones where either the Home shooter or players wrapping the D-corner aztec of wire MT cannot see ... or shoot. Given that the only insert prop is a mini-race it can make the D-side breakout appear rather daunting. It doesn't need to be. With all the dead space there is no reason not to take advantage of the opportunity to shake thinks up on your opponents once in a while. This can assist in countering the Home shooter and/or allow an extra gun to be up laning. A further advantage is the player gets to "read" the breakout action and respond accordingly meaning the player isn't necessarily forced to commit to a predetermined primary but can "flow" as the unfolding action allows. Learn the field. Once you think you have it start again.

Most of the time the D-side is the weak side. Two players are committed to playing the D-side. A one man attack is high risk but if you want to have a gun in position to deny or slow down your opponents rotations wide or upfield what do you do? The green lanes on the grid show shooting lanes available to a d-side player trying to deny movement. If you push both D-side players to the wire quickly most teams seem to lose the ability to deny movement but it need not work out that way. When you are wide and your opponent isn't instead of having the lead wire player focus on inside and cross field eliminations--which is the norm--and instead have the lead focus on wrapping and denying rotation from an upfield position while the second wire player moves up looking for the inside shots. One standard alternative is to simply get upfield more quickly than your opponent. Some teams and players will attempt to counter with aggressive bunkering efforts, which is fine if you're prepared, but plenty of other teams and players, particularly divisional players, will hesitate and struggle afraid to get too close or not close enough. And the fact you already hold the superior position means they can't.

The center of the field is a must play--at least some of the time. In prepping to play the center however don't simply consider how you're going to get to a particular prop and who you hope to shoot from it. Take a few steps further. The cans can be pinched and the MD can be attacked directly. What do you do when the pressure starts to mount? Hope to get skinny and live as long as you can? Or maybe a better idea would be to move before it comes to that. But where? The other question is when do you use the center? Oftentimes center play can be conditional; shoot a wide runner OTB and move up field to cut down angles and reduce distances.

When Home is only a TCK do not let your opponent get comfortable. A lot of teams will struggle to keep two shooters alive if you attack them with edgers OTB. You should already know it's a fairly safe option from the D-side so what are you waiting for? (See the orange squares.) Teams that routinely keep players inside OTB have to be countered. Force them to change. You may discover they don't know how and one simple adjustment puts them in a world of hurt. (Of course y'all still have to be able to hit something and I've seen plenty of 12 and a half balls per second wizards who are more danger to their teammates OTB than the opponents. Go practice.)

Who can shoot the gap in front of snake 1? The insert TCK but if the paint isn't streaming it won't work because because the TCK can't see most runners coming. And can be pushed off his edge by the opposite corner aztec. How about the Can? (See purple square.) There's a lane but no telling until the field is set up how much of one. And, if you look closely you will see the Can can see the corner aztec but only part of the gap between the corner and snake 1. Struggling to get into the snake? Use the corner--push the Can off his edge--take the snake--and refill.

Why refill? Because the corner--especially when you don't have a mirror--is the most valuable bunker until the end game phase begins. It feeds the snake, can contest its mirror on an equal footing and dominate the opponent's TCK and 30 Can and even blind shoot the insert snake side MT. If you aren't in the corner you're at a disadvantage. Plenty of props offer some utility but not playing the corner puts you in a hole. (On the flipside kill the corner, deny the corner will be a very effective tactic.)

And finally, check out the red square. It's another DZ. Getting hammered by edgers you can't seem to compete with? Giving up the 30 Can all day and the guy never comes off his edge? This wide DZ could be the answer you need. Get out there quick--like you're taking the corner--but come up short, gun up, and shoot some fools. The edger will never see it coming and even if you trade out with the Can player he's no longer pinning your team to the back line.

Wednesday, June 15, 2011

CBXL Event #2

Seems some of our Canadian friends are feeling a bit left out when it comes to breaking layouts down. Despite the fact I'm finding the process a bit tedious of late how could I turn our bros from the Great White North down? (At least this time.)
I'm going to do this one a bit differently however. The diagram indicates the basic snake side Home shooting lanes and on the opposite side of the field some different pathways are defined in four different colors; light green, dark green, light blue & dark blue. Given the CXBL plays traditional xball at 15 bps--and there are some wide open OTB lanes--I thought it might be worth taking a comprehensive look at a variety of ways of getting into the snake (alive, that is.)

Before we get started a couple of general comments. The
snake corner rockets (MTs) do not have complete control over the snake(s) [tall players excepted perhaps] but will end up battling each other hard. In addition the MT has dominating wraps on the snake side primaries and is also capable in a pinch of contesting the D-wire rotation from the opponent's 40 MD. Which reminds me, the snake isn't great (until you get past the 50) but neither is the D-wire. The only mitigating factors are the placements of the Cans and TCKs on both sides of the layout which are more susceptible to getting pinched but probably have to be played.

Let's get started. In one respect taking the snake (as is the case with any other possible primary) is pretty cut & dry, either the move is made OTB or some amount of time after the breakout. Since it's a contest there's usually some urgency. I'm going to focus here on the options that rely on changing sequences and use delays to misdirect your opponent. One quick reminder first: Remember, the distance between running lanes can be critical to regular success. A direct run to the back of snake 1 is generally the best in combination with a deep baseline run to the corner. (The counter from your opponent is to use the lane inside of the Can where the spacing between the snake & corner runner is closer and both will still be running upright. It is also a more difficult lane to shoot as it needs to be on target a "second" sooner than a wide lane.)
Looking at the light green paths you will see go right to the snake while the other delays somewhere around the TCK. There is a relatively effective Dead Zone past the TCK (moving outward toward the wire side) and behind the Pins. This area can be used in a number of ways. The light green path represents taking the snake OTB. The Dead Zone/TCK delay is one of a couple of related options. Version 1 a corner runner trailing the snake runner delays to shoot back at opponent's home and disrupt lane. Version 2, that player is a designated edger who will play the TCK as primary leaving it to Home shooter to take the corner after shooting the OTB lane. In either case an attempt is made to assist the snake runner by counter-laning back at Home. Looking at the dark green paths they could represent precisely the same sequences but don't. In this variant the corner runner leads. (And is also gunning back at Home.) The snake runner delays, either doubling on Home or zone shooting for an opponent running wide, prior to taking the snake. The alternative is the snake runner is also running & gunning but from a trailing position that offers the opponent(s) just enough time to focus on the lead runner but not enough to re-adjust as the trailing (snake) runner heads for the snake. The dark blue paths and one of the light blue paths indicate intermediate primaries (TCK, Pin, Can) that are launch points for taking the snake on inside-out rotations and are done in conjunction with a corner player. Where the difference in time with a trailing runner is perhaps a second and a runner on the delay is a bit more but ideally still less than two seconds there is no time limit on secondary moves into the snake. (Simple rule of thumb for delay runner is as soon as an opponent has moved through your lane it's time to go.) From any of the inside-out launch primaries the basic manuever is to use your Home shooter to keep opponent's widest guns from wrapping while your corner takes the opponent's Home off his lane. This leaves the player making the move into the snake with one or sometimes two (a crossfield shooter?) to check off/and-or deal with in order to make a successful rotation into the snake. If you have any follow-up questions post 'em up in comments.

There are a variety of creative ways to get a player into the snake quickly. These are some of the common options. They require coordination and teamwork in order to execute them effectively. Best of all perhaps they will apply to virtually any field layout you might play that has a snake, not just CXBL #2.

Friday, April 29, 2011

2011 Millennium Bitburg

This is a very unforgiving layout and I would be interested, after the fact, to watch some divisional teams try to play this. Any team that can do a halfway decent job of getting numerous guns up OTB has a distinct advantage. The shooting lanes are wide open and there aren't a lot of primary options--which means, among other things, teams will have to play the corner CKs (sometimes) whether they like it or not. (See the blue bunkers. More on them in a second.)
The giant M is intentionally offset. It is the same in the 3-D representations as well as the grid. I have no idea why but I can show you a practical application or two because of it. (The pink sections on the M indicate the approximate placement of the open space between legs of the M. The critical calculation is not whether or not the Pins close to Home can shoot through those spaces--they can--but whether or not the mini-Ms can shoot the opposing Cans on the crossfield--which it appears they cannot. If, for whatever reason, any mini-M is able to put backside pressure on an opposite crossfield Can it will change the dynamic of how the field (or that half anyway) can be played. (More on that coming too.)
Let's focus first on the principle lanes available (in red.) With a symmetrical, if slightly offset, design the same core lanes exist on both sides of the field. Additionally if you look at the orange lanes you can see that shooters at the board can turn and shoot nearly identical lanes. The ability to double up lanes creates a real challenge OTB for any opponent. The counter is to edge the Home zone hard on one or both sides. The counter to edgers is to use the Pins (on each side of Home) on the crossfield as the Pins protect the shooters and the crossfield exposes the edgers. What the offset M does is provide more protection for players floating in the Home zone--and is represented on the diagram by the extra shooting position charted between the board and the left Pin. The offset also provides more cover to the Home shooter OTB.
Once the point (game) is underway teams are going to be tempted to keep a player or players Home simply because they will be able to pound the lanes and gaps to limit their opponents upfield and wire movement. If this technique is used carry a lot of paint because a near constant stream of paint must be maintained in the gaps. (There are reasons not to do this but given the design the layout sets up repeated contests that require the players to gunfight and control edges in order to make moves and for teams that aren't proficient gunfighters will find this field frustrating.)
Returning to the blue bunkers it is necessary that the corner CK be an occasional primary. If it isn't then laners OTB will be able to focus on just a couple of lanes and gaps with likely dominating effect. (Similar discussion about spacing here in the recent NCPA layout.) Optionally a player could use the corner running lane to confuse laners and periodically hook up into an alternate prop. And perhaps surprisingly the corner does offer a couple of pluses. There are viable bumps into the T (feeding the snake?) and the snake anchor MD. In addition anytime the CK is the widest player there are a couple of good wrapping shots as well as blind shots on the upright bunkers; Can & MT. It is primarily a case of making the best out of a generally undesirable position.
Finally let's look at the green Cans. The lower risk option for playing one or both Cans is on the cross but as with playing Home to contain opponent movement it will be necessary to keep the paint coming as the Can player will not see a moving player in time to shoot them if the paint isn't already in the air. The better play, the offensive play, is to play the Can straight up where gaps can be dominated even though it is possible for more than one gun to contest the Can player at one time. It must be played very tight and with economical movement but it is more than possible. The Can is also a good launch point for inside/out rotations to the (snake) MD on the wire.
To conclude: breakout tactics will be a cat & mouse game (if you're lucky) with heavy guns up most of the time followed by lots of gunfighting match-ups and most points extended, if they last more than 15 or 20 seconds, by teams playing 3 on 2's or 3 on 3's which should turn into lose a critical gunfight, lose the point. Lastly, be careful of all the low elevation props as it will be easy for players to get buried (and blown up) in bunkers like the mini-Ms and CKs.

If nothing else this layout will help make ordinary players better or it will expose just how ordinary a player really is.

Tuesday, April 26, 2011

Field Analysis: 2011 WCPPL 2

On this layout the potential exists for some very fast and destructive points to be put up from the D-side. This is true despite the fact that many D-wire bunkers are in a disadvantageous position vis-a-vis the snake. The key to those fast points is to either quickly eliminate D-side players and/or deny them wide spots on the field while taking large chunks of real estate early. But instead of outlining just how that can happen I want to spend time discussing the counters and to transition from control bunkers to ignite the offense on the snake side.
Let's begin with the D-side, midfield Can in blue. The D-wire design limits the control the corner bunkers have over movement along the wire while creating an initial gunfighting lane between the symmetric pair of MDs. Home does command a couple of gaps in upwire movement but does so with partial vision at best which neutralizes Home's effectiveness unless Home is able to maintain a constant stream of paint in the gap or gaps. While the D-side Pin may be played--particularly if the opponent(s) are already on the wire--it is a very high risk position that is very susceptible to crossfield shots. That leaves the blue Can as the best (of a poor batch) of control bunkers on the D-side. It offers the option of a secondary shooting lane OTB along with a commanding position over the core primary D-side options. Of course the Can is at similar risk to the Pin from crossfield shots which limits how long the Can can be played safely and effectively.
The placement of the blue Can forces the players into a quick transition--or a quick elimination--when the Can is used to play a point with an extra gun up and inside/out. But what else is the Can good for?
First, let's look at the options available to the player in the Can. When the Can is played to the D-side the player's secondary options are bump out to the wire (Temple, mini-A) or rotate back and over to the D-wire MD. Or, up field to the orange Pin. Normally this move is reserved for situations where your opponent's wide player has been eliminated. The object is to cut off the field, deny your opponent an opportunity to reach the D-wire, pressure Home and look for quick snake side eliminations. Alternatively the blue Can be played on the cross either in conjunction with the snake side 20 MT or independently. The value here is that the blue Can can deny rotation into the snake with only the mimi-A (that feeds the snake) able to contest the lane. However, given the distances involved it is necessary for the Can to keep up a semi-constant stream of paint.
If the blue MT is also used on the cross (with the Can) it cannot put the same pressure on the opponent's corner Temple or MD but it does offer reasonable gap control for containing upfield wire movement. Ideally, like the Can, a near constant stream of paint in the targeted gap offers the most promise. Otherwise the blue MT to command the snake, contest snake wire movements & gunfight with the TCK. It is also an ideal launch point for pushing additional players into the snake. Or an upfield move to the green MT.
On this layout snake side play can easily bog down into a repetitious pattern of blazing gunfights as teams/players try to force the action to get into the snake. However I think the placement of the two MTs goes a long way toward neutralizing the snake's potential effectiveness. And when the opportunity presents itself players pushing the D-wire will bypass the most at risk (from the snake) bunkers completely. There is the potential though to make a strong play upfield along the MTs. The same applies to a move, either OTB or on a slight delay, to the snake side of the X. (I'm not calling it an A.) The upfield MT (green) blocks the majority of snake side primary positions which will allow and X-side player to gun down any move to the snake, wrap and attack Home & even bump to the opponent's forward MT and attack crossfield positions or snake side primaries. And as long as there are no snake players the same lane of movement and attack is available between the upfield MTs. Used judiciously this attack should disrupt your opponents and force them to address the possibility each time they breakout.
UPDATE: It was getting late last night and it appears I left out the green Pin. Given identical or near identical placement it should be possible to use the Pin as a launch point into the snake. The advantage over the mini-A for making the rotation into the snake is that the player is on his/her feet, is more mobile and can make the transition more swiftly. And should it prove necessary the Pin can contest edge control with the corner TCK or the mirror of the green MT.

Friday, March 4, 2011

MS Paris Longchamp blowup

Before I begin on the upcoming MS event layout I need to apologise to VFTD's followers out in PALS country. I received their layout with a request to do a breakdown--which I intended to do--but neglected to check the event's date. And--you guessed it--it done came and went. Sorry about that.

This field is a very technical design that is playable but only highly skilled players are going to be able to make the most of it. (And I remain skeptical that they will enjoy it much.) Less skilled and lower division teams are likely to work ruts into certain runs and bumps because they won't have much alternative. I expect some teams to find this very frustrating unless their players happen to enjoy routinely running to their death or constantly battling out of props that don't push the action.
Let's briefly discuss the snake side. The Home lane displayed in red is the probable primary OTB lane. (A better lane is the one inside the Can and between the trees and SD but I suspect it will be difficult for many team's primary shooter to consistently put an effective lane thru that zone.) However the red lane, when shot properly, will deny the mini, tall cake and snake. (Barring bad luck and/or bad paint.) And it is easily redirected on a player trying to make a move into the Can. Additionally, a disciplined Home shooter will be able to deny upfield bumps past the snake SD with very little difficulty.
The props marked in yellow are the only dual elevation props on the snake side (excluding the trees.) By dual elevation I mean the props may be played on a knee or on the feet, even though the tall cake can--and will be --problematic--as will the Can. Given the elevation and placement of the rest of the snake side props only the Can and Home are decent counters for an active snake player--which is another reason many teams will maintain a Home shooter. Otherwise contesting the snake will be much like the D-side; up close and personal. And with no snake corner prop the SD actually slows down a player's ability to get wire-side; making the snake more difficult to take OTB. All things considered for most teams the snake side is likely to slow play until bodies start to drop.
More interesting is the D-side. The gradient pink area is the primary OTB laning zone. A Home shooter also has a very narrow lane (see dotted line) that will be dependant on actual on site prop placement plus a lane on the outside of D1 (or D3.) In the case of the dotted lane the fact its trajectory must be lifted above the near T will allow a runner to dive low between the Can and D1. Given that there is a D-corner bunker it will be possible to run the Can OTB and if you can make the Can you can make D1. Note all the blue lanes from the various D-side props. Only the mirror Can or the nearest-to-Home MD has an opportunity to contest the run. The run requires speed but it won't be that hard to make. And once in D1 a player commands lanes on all the snake side props except Home and the snake itself. If that happens OTB it should result in a short point.
Because other D-side props can't contest D1, it will be necessary to close and attack the opposition directly. By the same token there are few effective lanes to battle D1 there are equally few lanes that can support and defend D1. Which means, like the snake side, contests on the wire sides could devolve into who bunkers who last. Or, everybody can hunker down and shoot long range lanes.
The primary tension created by this layout is the need to battle at the fifties versus the obvious utility of keeping players in Home. Figure that out and you may have discovered a winning formula.

Thursday, March 3, 2011

Thoughts on the layout of PSP Galveston

As most of you probably know the new PSP rules for 2011 fostered a fair amount of debate. In particular those rules that altered the playing field. It was spectacularly obvious (to some) from the get go the new rules would be a step back from the xball ethos that has, in past seasons, driven the PSP. Many suggested, including VFTD, that the new rules would slow the games down--perhaps enough to make the clock the arbiter of winning and losing more often than the Race 2 result. We will see. It is a distinct possibility given the layout the PSP has released for Galveston. The only mitigating factor is that probably more teams than not won't be able to hit the broadside of a barn off the break--or an opponent for that matter. (And it's highly questionable if the inability to hit anyone OTB will speed up or slow down any given point. That will depend on what a team does with an 'extra' body.)
Instead of the usual review that offers some tips on shooting lanes or breaks down some aspect of how a given field will play this time VFTD will explain in detail the characteristics of this layout that tend to encourage defensive play and slow overall movement. To begin note there are three colors used; orange, yellow & green. Green for example represents those nice cozy spots where one might settle down to cultivate a little garden. (I'm kidding. Sorta.)
Sticking with green that's the real point. You'll be sticking with green. The backline bunkers are the only wire feeds that may be taken OTB with relative security. They both force the player to the ground reducing visibility and making exiting the bunker that much more difficult. The snake side "new brick" has some (marginal) utility in contesting the snake. The d-side cake has less. And as long a player is contained in one or the other it will inhibit further team movement from the inside out or compel a teammate to a longer, riskier move. On the d-wire the other "new brick" might as well be a stop sign as that is the effect it will most often have as the same characteristics apply that affect the other green bunkers.
Moving on to the orange designated bunkers it should be immediately apparent 2 of the same bunkers that are green on the diagram are also orange on the opposite end of the field. That's because the bunkers are as ineffectual as defensive positions as they are as offensive launch points. From the cake it is clear that despite an inside angle the cake cannot contain or inhibit movement along the d-wire or even contest rotations from its mirror, given the distances involved. The "new brick" feeding the snake is slightly more useful in that it may inhibit some movement but will also be under heavier attack from more positions on the field much of the time. The thing to remember is that the lack of options from these bunkers will at the same time encourage the effort to push more players to the wires while also often making it more difficult to do so.
Finally the yellow designated bunkers appear to be the only tips of the hat to the hoped for influx of lumberjacks the PSP wanted to attract with the rule changes. You know, the bigger, slower, older player who played tourney ball when dinosaurs roamed the Earth. The yellow bunkers are both MTs and both positioned where they are primarily defensive in nature and any layout that virtually requires backfield bunkers to be played for extended periods of time (or in isolation) are fields that tend to neutralize any (but not all) aggressive play tendencies.
One key to this kind of field is player elevation--and, no, I don't mean levitation--I mean lines of sight and ability to respond quickly. (Bunkers a player can stand up in, or play tall.) Much of this layout wants to bury the player's nose in the ground and that tendency must be resisted. Remember communication is just an extension of what you can see. It is important to play this field as tall as possible and maintain crossfield communication.

Thursday, December 16, 2010

The Indian Int'l Open 2011

Okay, kids. Seems India has some hardcore ballers looking to get in on all the competitive paintball fun and to kick their party off right they're introducing the world to paintball in India with the Indian International Open. (Link in title.) (Yep, news to me, too.) A request for a review of the layout came over the VFTD transom from the UAE. How could I turn them down? It's the holiday season and I'm no Grinch. Besides, it's an international open, right? So here it is. Btw, click on the layout for a full sized version.

This is a very compact layout that is nearly square. The impact is reduced distances--and even what seems like insignificant distances--condenses the bunker placements which makes for more intense gunfighting and will prove to be, generally, a more difficult layout for less experienced teams. [And given the position of certain key bunkers will encourage a defensive, counter-punching style of play.] The up close factor is mitigated to some degree because there are few open lanes or unobstructed crossfield shots. However, that also means the field can be (and will be) played in halves. [If one side of the field breaks opportunities will exist to press the advantage very quickly and teams or players up to the challenge will be rewarded.]

Laning OTB is a straightforward task on this field. Gaps are fairly narrow and the basic, bread-and-butter lanes are simple. Guns must be up and shooting immediately. If that means practicing moving forward and behind the cover of Home while shooting an effective lane that is a practice priority. The wider D-side lane is the stock lane to shoot. The inside lane is for players delaying or looking to move out and up into the near MD. (There is also an unmarked likely obstructed lane to the inside edge of the TCK which is very likely to be a popular primary.) Shooting the snake-side lanes is equally straightforward and your choice between lanes 1 & 2 (1 being closest to Home) is mostly a matter of how quickly you can achieve a consistent lane. Normally as soon as someone runs through that lane the laner shifts his lane inside or onto the snake gap. Teams that are playing more defensively will require shifting to an inside lane and more aggressive teams or individuals require the shift to the snake gap.

Once again an MS field layout features an SD in the snake corner. (Colored green) It should normally be avoided. It is only marginally effective for snake wire control. It is isolated and under the gun of your opponent's snake-side MT and at a huge disadvantage. It may be necessary on rare occasions to go there to get wide but is a poor risk under any circumstance. The run to the SD and around it may be considered as an alternative snake run for some faster players. The orange marked bunkers (along with the Home cans) are the vision bunkers given that players can routinely play them standing. The D-corner MT controls that half of the field unless there is a mirror and the D-side TCK is a relatively safe primary OTB and has clear lines-of-sight on most of the gaps and lanes on the D-side of the field. Expect them to be played a high percentage of the time and anytime you have the advantage of an uncontested D-corner MT do not let your opponent fill your mirror. The snake-side MT doesn't have the same dominance potential as the D-corner the majority of the snake-side action will revolve the play of this bunker. [Clever use of the bricks can help defeat the MT.] Note the blue lane from the snake-side T to the opposition D-corner. This is an example of the sorts of blind or near blind shots to be on the lookout for. D-corner players are prone to checkoff the inside of the field and if they do it while standing it will be possible for the T to shoot the D-corner who is unlikely to ever see it coming. On a field like this 2 or 3 similar shots can be quiet game winners.

Looking at the green arrows on the top of the diagram snake-side; these represent running lanes and/or running & gunning lanes. Given that you know where the primary OTB lanes will be shot it becomes key to your success to understand the ways in which to avoid being hit. Given the distances involved the laner could easily miss a runner on the baseline going wide if the lane is intended to hit a runner going to the MT, for example. And the running lane that appears to be going wide but cuts back toward the MT offers two primary options. Either the MT (which was hooked past) or the Brick. And when the direct route is run to the MT it is worth diving into the bunker in order to get under the stream of paint and/or force your opponent to shoot even lower next time making a different run more effective. To take this a step further consider making these runs guns up and focus on two alternative actions; getting wider than your opponent so can shoot inside back at them or delaying in spots to add an extra gun shooting. By adding to the number of guns shooting OTB and mixing up your running lanes and delays it is possible to confuse and neutralise much of your opponent's potential effectiveness OTB.