Let's begin with a quick review of the layout. It's nearly an archetypal Xball design except there's little value in attacking up the center and none of the corners offer any significant wire control. Each corner section of the field is made up of a triangle of three props; the insert, the feed and the corner. The value of playing the corners is largely to command edges from an advantageous position in assisting teammates to make the move to the wire and/or denying same to your opponent. Adding some variation are the two mid standing props; the D-Can & the Aztec. To regular competitors even these ought to look familiar as this relative placement is quite common as well. Given the layout the points played will feature (and reward) strong gun play and coordinated action. (Communicate, communicate, communicate.) The mid-field stand-ups will also encourage some teams to play them consistently and defensively oriented teams will want to cross them up as often as not. Our focus will be on the breakout and how to utilise the stand-ups more offensively as part of a diversified attack.

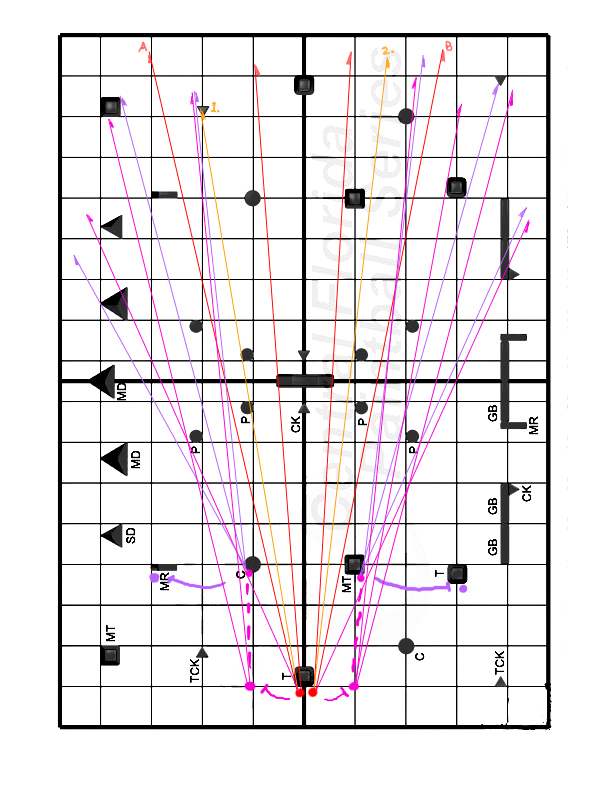
In diagram A the red lines are principle lanes. Note the lines marked A & B. They are the primary OTB lanes from Home. The interior red lines are optional and only useful if your opponent is delaying their breakouts or attempting to counter your Home shooters. Take a look now at the orange lines marked 1 & 2. 2 is an option to either red snake side lane and may catch the occasional floater intent on shooting a lane before making his/her primary prop. If the opponent is consistently breaking hard that lane is unlikely to be effective as it will almost always be late. 1 is a bit different. Note how the lane crosses over a Pin. One of the secrets to effective laning OTB is to find and utilise unusual lanes that catch players unaware. However, there are risks. In this case the Home shooter must shoot the lane standing--or nearly so--otherwise the paint won't drop in time to hit the TCK (and be at a level that may catch your opponent.) (Shooting lane 1 from a kneeling posture won't be effective because of the angle change unless the shooter's velocity is well below normal ranges.) Likewise, standing or not shooting over the mirror Pin on your opponent's half of the field won't hit anyone except perhaps a player delaying close to the back boundary. The pink lines show the secondary lanes available if the OTB shooter stays Home or makes the delayed move to one of the mid-field stand-ups. Note that the pink dots approximate alternative "Home" OTB laning positions and offer the shooter good laning zones and the ability, in most instances, to put paint on likely props. The purple lines are the same side lanes that are available once the player is in a midfield stand-up. Take note of purple arrows indicating a rotation toward the wire from the stand-ups. The stand-ups offer an excellent alternative path to the wire feeds particularly if there is a teammate in the corner. (The best option is to match that rotation to a support player in a corner but it isn't necessary.)

Switching to diagram B note the props surrounded in green. The green lines represent the primary Home OTB lanes and the more effectively those lanes are shot the greater the likelihood your opponent will begin holding up on their wide breakout moves. Containment provides new offensive opportunities. (This is likely to occur more often on the D-side of the field as most teams will play weakside on the D-side. This means they will tend to commit only two of their 5 players that way.) Better yet if the opposition uses the Can to play the cross field angles you are no facing only one gun caught in a compact insert. And even if, when using the Can on the cross field, Home stays D-side the opportunity to attack the center of the field as a secondary option remains. The goal is to eliminate the widest gun (and at a minimum hold them in that spot) while positioning yourself to deny any moves to your wire while gaining new angles to threaten other positions. So while it is probably not an effective move to go up the center OTB given the right circumstances--circumstances your team can force on your opponent--secondary moves up the middle ought to be nearly automatic responses to the correct set of conditions.
In both diagrams the focus is on making full use of the stand-ups effective lanes while maintaining an offensive mindset. Too often teams, newer and lower division ones in particular, tend toward a defensive approach regardless of their talk or intentions and this can happen unconsciously even in playing certain props--like these midfield stand-ups--that promote a defensive style.


6 comments:
The D side corner Aztec seems very dominant to me, if taken off the break and not mirrored?
It can easily contain any further movement outwards on the D side, especially as you have the option of doing it from both sides of the bunker, and you can angle out of a lane by playing it low.
The really creative and aggressive back, can even drop into the dead spot behind the SD when the gap is there, use the pins to shade out home, can and centre aztec, and be left to only dominate the tall cake, in order to take the first MD.
So, looking at the design, I would expect most teams to take a gamble on that corner run, in a lot of points, and do it with a front, as pushing up from the corner seems far from impossible, even with 5 up on both sides.
I think line A has to be a given OTB every single break, irrespective of the game plan.
It's not but if you wanted to say it could be used to inhibit some inside out movement I wouldn't argue with you--much. However playing the inside edge of the D-side corner Aztec puts the player at a disadvantage versus guns in either midfield standup--unless it's played low in which case it's practically conceding the inside out rotation--and on a more or less even footing with the TCK. And the Aztec doesn't even inhibit wire moves until the 50.
Nick, I'll be sending you the WCCPL layout and expect you have your analysis done by the end of the week. :)
I totally agree the inside is hard to play. Both snake corner and the T at the snake have nice blind shots to the inside of the D corner, which the snake coach can easily call out for (respectively, the T at the snake and the snake corner can't play loose).
So, you won't be playing the inside of the D corner much, but it's always nice option to have, if you are loosing a gunfight, that both sides of your bunker can be used, and both high and low. - You will be playing the outside 99 % of the time though.
As for not being able to inhibit wire moves, that is less true if the corner is not mirrored. Then you suddenly have some room to work with back and outside of the corner, to gain angles on wire moves.... Takes attention to detail though, a foot in the wrong direction, and you can get shot from anywhere in the centre or across, but skilled players can do it.
That's why I said the corner run has to be a focus point every game, either doing it or preventing it... it's a very versatile and dominant bunker for a smart player.
BTW, my last paragraph in the first post was meant to say "OTB shooting", as in, teams are forced to try and shut down that run every breakout, as giving away the D corner without mirroring it, can spell disaster.
Speaking on the other side, I think this field has a very weak snake side.
The snake corner is only viable for midgets, as soon as the opponent D side reaches the first MD.
Also it's fairly easy to contain snake 1 from the D side can, or snake 2 (being the first MR) from the S side Aztec.
So, it will be hard to move up, against an organised team.
Even going past the 50 into snake 3, you don't really have much in the way of sure kills, if the opponents D side play their bunkers tight.... and you have nowhere to go from Snake 3.
I would expect 75 % of games to be won on the D side. The percentage balances out a little better, if a team has a really good coach/snake front combo, but the windows of opportunity sure are smaller than on most other fields.
Post a Comment